使用Quagga在Mininet节点上进行OSPF实验
本文使用Mininet生成虚拟网络节点,并在虚拟节点上运行Quagga进程,模拟路由器的OSPF协议进行网络实验。
摘要:
本文使用Mininet生成虚拟网络节点,并在虚拟节点上运行Quagga进程,模拟路由器的OSPF协议进行网络实验。
本文参考了:
对错误的部分进行了修正,对不足的部分进行了补充
实验环境:Ubuntu18.04 Server版,Mininet 2.3.0,Quagga 0.99 或者1.2.4
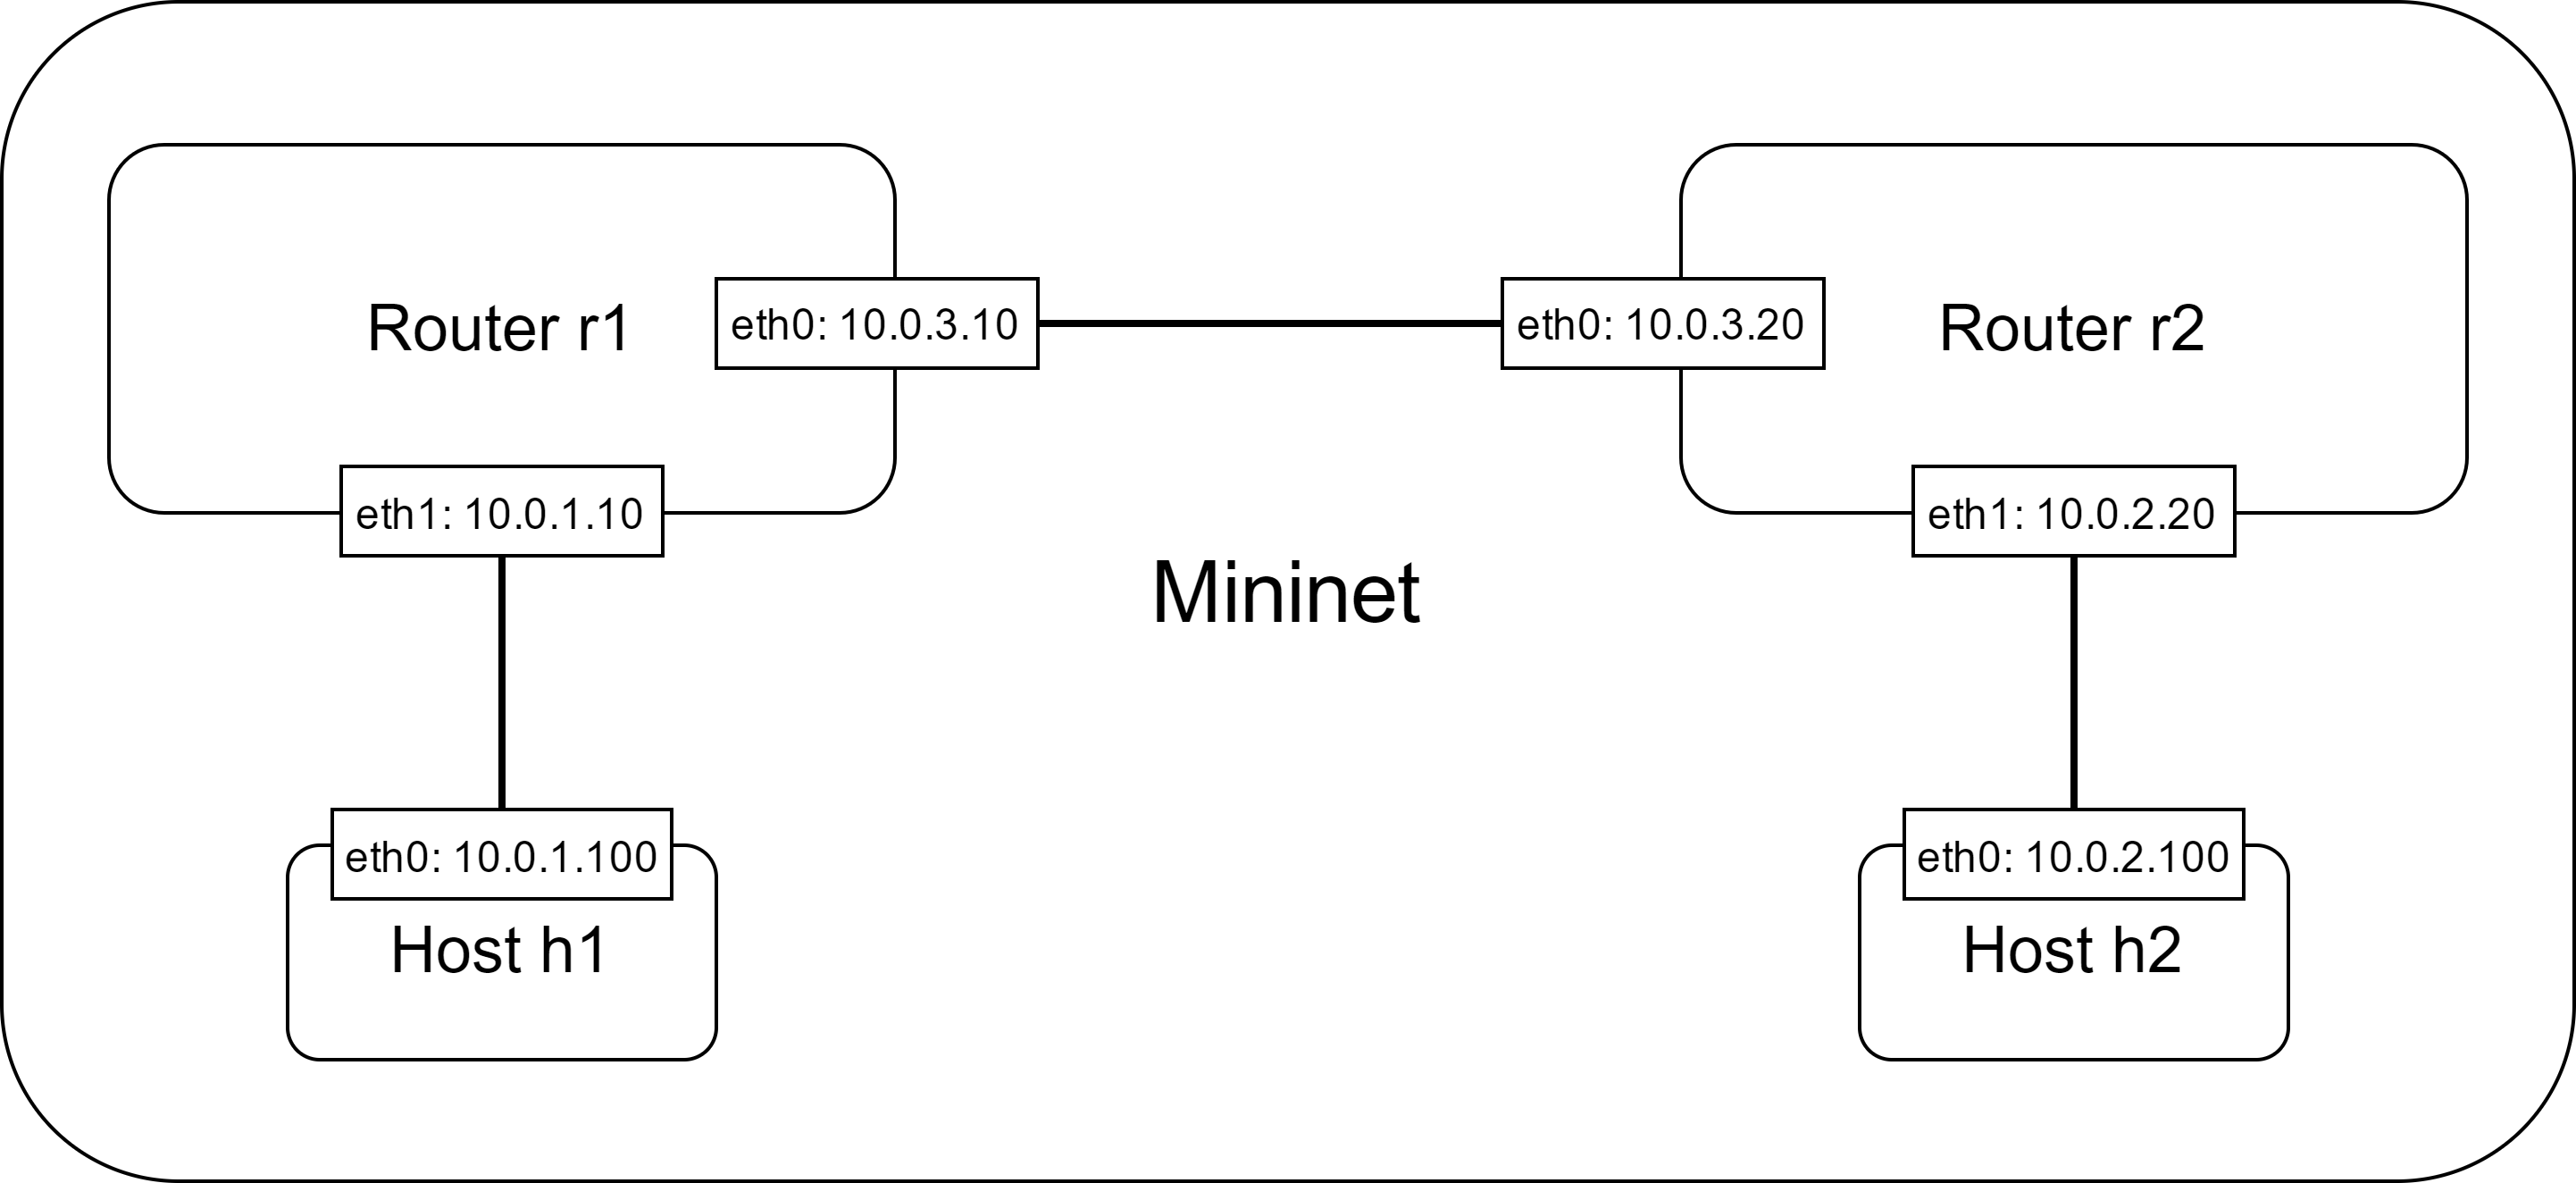
实验拓扑图:
一、Mininet安装配置:
使用apt直接安装:
sudo apt install mininetMininet缺省使用Python2,要使Mininet支持Python3,执行:
sudo pip3 install mininet二、Quagga 安装配置:
1、Quagga 0.99,若使用Quagga 1.2.4可跳过此段
1.1、源码编译安装:
下载地址:Index of /repo/pkgs/quagga
这里下载的是 quagga-0.99.24.1.tar.xz
安装方法:参考:linux路由器Quagga的配置(一):安装 ,依次执行下列命令
sudo apt install texinfo
tar xvf quagga-0.99.24.1.tar.xz
cd quagga-0.99.24.1
./configure --enable-vtysh --enable-user=root --enable-group=root --enable-vty-group=root
make
make install
1.2、Quagga 0.99 配置文件目录是:/usr/local/etc,因此执行:
sudo cp /usr/local/etc/zebra.conf.sample /usr/local/etc/zebra.conf
sudo cp /usr/local/etc/ospfd.conf.sample /usr/local/etc/ospfd.conf
sudo cp /usr/local/etc/zebra.conf.sample /usr/local/etc/r1zebra.conf
sudo cp /usr/local/etc/zebra.conf.sample /usr/local/etc/r2zebra.conf
sudo cp /usr/local/etc/ospfd.conf.sample /usr/local/etc/r1ospfd.conf
sudo cp /usr/local/etc/ospfd.conf.sample /usr/local/etc/r2ospfd.conf
1.3、 拷贝Quagga运行库:
sudo cp /usr/local/lib/libzebra.* /lib
sudo cp /usr/local/lib/libospf.so.0 /lib
1.4、启动zebra:
sudo zebra -d1.5、编辑/usr/local/etc/r1ospfd.conf:
hostname r1_ospfd
password 123
enable password 123

router ospf
  ospf router-id 10.0.3.10
  network 10.0.3.0/24 area 0
  network 10.0.1.0/24 area 0
debug ospf event
log stdout
1.6、编辑/usr/local/etc/r2ospfd.conf:
hostname r2_ospfd
password 123
enable password 123

router ospf
  ospf router-id 10.0.3.20
  network 10.0.3.0/24 area 0
  network 10.0.2.0/24 area 0
debug ospf event
log stdout
2、Quagga 1.2.4 安装配置:
2.1、直接使用apt下载安装:
sudo apt install quagga=1.2.42.2、Quagga 1.2.4 配置文件目录是:/etc/quagga,因此执行:
sudo cp /usr/share/doc/quagga-core/examples/zebra.conf.sample /etc/quagga/zebra.conf
sudo cp /usr/share/doc/quagga-core/examples/ospfd.conf.sample /etc/quagga/ospfd.conf
sudo cp /usr/share/doc/quagga-core/examples/zebra.conf.sample /etc/quagga/r1zebra.conf
sudo cp /usr/share/doc/quagga-core/examples/zebra.conf.sample /etc/quagga/r2zebra.conf
sudo cp /usr/share/doc/quagga-core/examples/ospfd.conf.sample /etc/quagga/r1ospfd.conf
sudo cp /usr/share/doc/quagga-core/examples/ospfd.conf.sample /etc/quagga/r2ospfd.conf
2.3、 拷贝Quagga运行库:
sudo cp /usr/lib/quagga/* /lib2.4、启动zebra:
sudo zebra -d2.5、编辑/etc/quagga/r1ospfd.conf:
hostname r1_ospfd
password 123
enable password 123

router ospf
  ospf router-id 10.0.3.10
  network 10.0.3.0/24 area 0
  network 10.0.1.0/24 area 0
debug ospf event
log stdout
2.6、编辑/etc/quagga/r2ospfd.conf:
hostname r2_ospfd
password 123
enable password 123

router ospf
  ospf router-id 10.0.3.20
  network 10.0.3.0/24 area 0
  network 10.0.2.0/24 area 0
debug ospf event
log stdout
三、实验程序代码QuaggaOSPF.py:
路由器节点使用的普通host节点,与普通host的区别是:
1、打开路由转发功能:sysctl net.ipv4.ip_forward=1
2、运行quagga的两个进程,zebra, ospfd
#!/usr/bin/env python3
# coding: utf-8

from mininet.topo import Topo
from mininet.net import Mininet
from mininet.node import Node
from mininet.log import setLogLevel, info
from mininet.cli import CLI
import time
import os

class LinuxRouter( Node ):
    '''模拟路由器的节点'''
    def config( self, **params ):
        super( LinuxRouter, self).config( **params )
        # 启动时,打开路由转发功能
        self.cmd( 'sysctl net.ipv4.ip_forward=1' )

    def terminate( self ):
        # 结束时,关闭路由转发功能
        self.cmd( 'sysctl net.ipv4.ip_forward=0' )
        super( LinuxRouter, self ).terminate()

class NetworkTopo( Topo ):
    '''网络拓扑,A LinuxRouter connecting three IP subnets'''
    def build( self, **_opts ):
        defaultIP1 = '10.0.3.10/24'  # IP address for r1-eth0
        defaultIP2 = '10.0.3.20/24'  # IP address for r2-eth0

        # 添加两个路由节点router1, router2, 并配置IP
        router1 = self.addNode( 'r1', cls=LinuxRouter, ip=defaultIP1 )
        router2 = self.addNode( 'r2', cls=LinuxRouter, ip=defaultIP2 )

        #添加两个主机节点h1, h2,并配置IP,缺省网关
        h1 = self.addHost( 'h1', ip='10.0.1.100/24', defaultRoute='via 10.0.1.10')
        h2 = self.addHost( 'h2', ip='10.0.2.100/24', defaultRoute='via 10.0.2.20')

        # 添加router1与router2之间的链路
        self.addLink(router1,router2,intfName1='r1-eth0',intfName2='r2-eth0')

        # 添加h1与router1之间的链路
        self.addLink(h1,router1,intfName2='r1-eth1',params2={ 'ip' : '10.0.1.10/24' })#params2 define the eth1 ip address
        # 添加h2与router2之间的链路
        self.addLink(h2,router2,intfName2='r2-eth1',params2={ 'ip' : '10.0.2.20/24' })

def run():
    '''Test linux router'''

    # 创建网络拓扑
    topo = NetworkTopo()
    # 启动mininet
    net = Mininet(controller = None, topo=topo )  # controller is not used
    net.start()
    info( '*** Routing Table on Router:\n' )

    r1=net.getNodeByName('r1')
    r2=net.getNodeByName('r2')

    info('starting zebra and ospfd service:\n')
    # 启动路由节点zebra,ospf进程
    r1.cmd('zebra -f /etc/quagga/r1zebra.conf -d -z /tmp/r1zebra.api -i /tmp/r1zebra.interface')
    r2.cmd('zebra -f /etc/quagga/r2zebra.conf -d -z /tmp/r2zebra.api -i /tmp/r2zebra.interface')
    time.sleep(1)#time for zebra to create api socket
    r1.cmd('ospfd -f /etc/quagga/r1ospfd.conf -d -z /tmp/r1zebra.api -i /tmp/r1ospfd.interface')
    r2.cmd('ospfd -f /etc/quagga/r2ospfd.conf -d -z /tmp/r2zebra.api -i /tmp/r2ospfd.interface')

    # 启动网络命令行
    CLI( net )
    net.stop()

    # 清理ospf, zebra进程,删除临时文件
    os.system("killall -9 ospfd zebra")
    os.system("rm -f /tmp/*.api")
    os.system("rm -f /tmp/*.interface")

if __name__ == '__main__':
    setLogLevel( 'info' )
    run()
运行代码:
sudo python3 QuaggaOSPF.py等一分钟左右,运行pingall,即可ping通:
root@ubuntu1804:~# python3 QuaggaOSPF.py
*** Creating network
*** Adding hosts:
h1 h2 r1 r2
*** Adding switches:

*** Adding links:
(h1, r1) (h2, r2) (r1, r2)
*** Configuring hosts
h1 h2 r1 r2
*** Starting controller

*** Starting 0 switches

*** Routing Table on Router:
starting zebra and ospfd service:
*** Starting CLI:
mininet> pingall
*** Ping: testing ping reachability
h1 -> h2 r1 r2
h2 -> h1 r1 r2
r1 -> h1 h2 r2
r2 -> h1 h2 r1
*** Results: 0% dropped (12/12 received)
mininet>
四、注意:
- QuaggaOSPF.py代码中61到65行的 zebra命令的参数 -f 为配置文件路径,上述代码为Quagga 1.2.4的目录,如使用Quagga 0.99可修改为对应的目录/usr/local/etc。
- QuaggaOSPF.py代码中61到65行的 zebra命令的参数-z 和 -i 指定的文件,是供zebra和ospfd进程通讯用,放在/tmp目录下可正常运行,其他很多目录都试过不行。
- QuaggaOSPF.py代码中第77行 setLogLevel( 'info' ) 可以改为setLogLevel( 'debug' ),方便执行QuaggaOSPF.py时,打印错误信息,我也是通过这个手段,改正了大多数错误,最终正常运行的。
五、补充:
- 节点上运行的非后台进程有时间限制,超过一定时间(一两分钟),Mininet会自动结束该进程(文档中没有提到,调试好久才发现的),若要在节点上运行长时间存在的进程,比如http服务器,ftp服务器等,需要使用一点技巧。如:在节点h1上运行server.py,可以使用:
这样server.py可以长时间运行,但是h1被终止时,server.py并不会自动结束,因此需要在退出Mininet之前(run函数的最后)调用kill命令杀死之,可以使用h1.cmd('nohup python3 server.py > /dev/null 2>&1 &')
自动杀死所有含有server.py命令的进程。os.system("ps -ef | grep server.py | grep -v grep | awk '{print $2}' | xargs kill -9")

有“AI”的1024 = 2048,欢迎大家加入2048 AI社区
更多推荐
 8
8 0
0- 0


 已为社区贡献1条内容

所有评论(0)