新手入门-VSOMEIP 实现双机通讯和Wireshark抓包分析
虚拟机 ubuntu20.04 ,因为使用进行双机通讯,所以需要把主机的防火墙给关了,而且虚拟机要配置城桥接模式,使2台ubuntu系统的机器处于同一网段,保证两台ubuntu设备能互相ping通。比如我的两台ubuntu设备,一台是虚拟机,ip为:172.20.10.7,另一台是ubuntu设备(非虚拟机),ip为:172.20.10.6,处于同一局域网内,互相ping下,保证能ping通。重要
1. vsomeip开源协议栈编译环境搭建
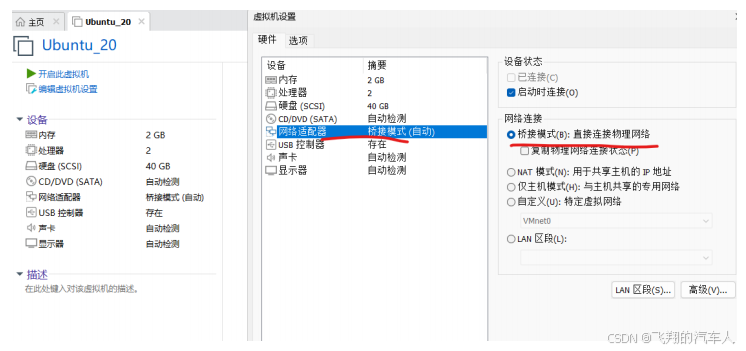
1.1 虚拟机网络配置
虚拟机 ubuntu20.04 ,因为使用进行双机通讯,所以需要把主机的防火墙给关了,而且虚拟机要配置城桥接模式,使2台ubuntu系统的机器处于同一网段,保证两台ubuntu设备能互相ping通。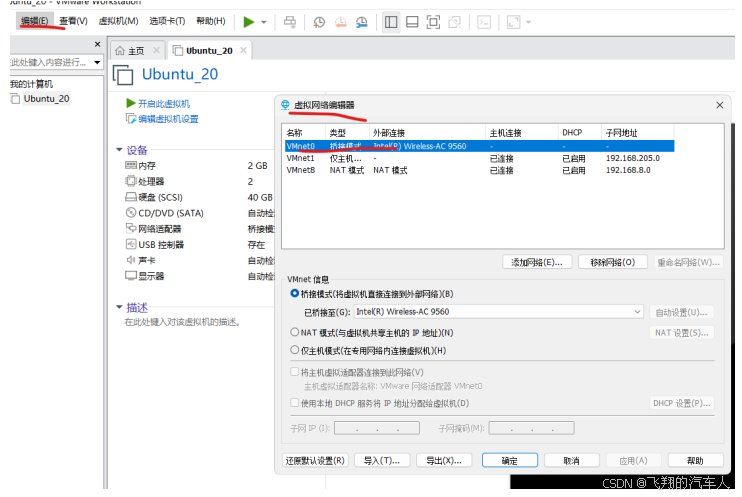
比如我的两台ubuntu设备,一台是虚拟机,ip为:172.20.10.7,另一台是ubuntu设备(非虚拟机),ip为:172.20.10.6,处于同一局域网内,互相ping下,保证能ping通。
双机通讯需要支持路由组播功能,我们确认下是否支持组播,如下图,有 MULTICAST,表示支持组播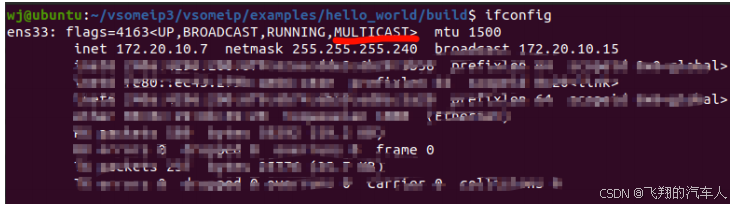
后面进行双机通讯的时候再介绍如何将组播地址加入到路由中
1.2 安装相关工具链
安装boot库和编译工具链
sudo apt-get install libboost-system-dev libboost-thread-dev libboost-log-dev

sudo apt-get install gcc g++ make cmake
cmake 推荐使用下面安装,可以安装高版本的cmake
sudo snap install cmake --classic
下面这些文档工具可安装也可以不安装
sudo apt-get install asciidoc source-highlight doxygen graphviz
安装git
sudo apt-get install git
通过git 克隆下载vsomeip源码工程
git clone https://github.com/GENIVI/vsomeip.git
github经常无法访问,就用国内的gitee
git clone https://gitee.com/mirrors/vsomeip.git
2. vsomeip开源协议栈编译和样例demo编译
2.1 编译vsomeip开源协议栈和安装
在git clone所在的文件夹内执行以下命令,进行编译和安装
cd vsomeip
mkdir build
cd build
cmake -DENABLE_SIGNAL_HANDLING=1 ..
make
sudo make install
-DENABLE_SIGNAL_HANDLING=1 是为了响应ctrl+c来手动终止进程
2.2 编译helloworld的样例
进入hello word目录下后,创建build目录
mkdir build
cd build
cmake ..
make
最后在build目录下生成,1个客户端,1个服务端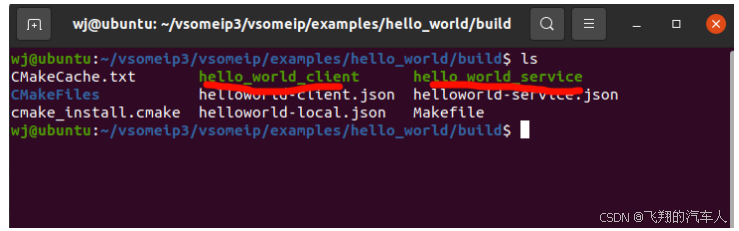
3. helloworld样例双机通讯配置
以上操作,2台ubuntu设备都是一样的,下面分别为服务端PC 和 客户端PC进行分别配置
3.1 helloworld 服务端配置(虚拟机,IP:172.20.10.7)
我们需要编写下helloworld-service 服务端的json配置文件,然后将该json文件重命令 “helloworld-service.json”并保存到helloworld / build 目录下即可
{
    "unicast":"172.20.10.7",
    "netmask":"255.255.255.0",
    "logging":
    {
        "level":"trace",
        "console":"true"
    },

    "applications":
    [
        {
            "name":"hello_world_service",
            "id":"0x4444"
        },
        {
            "name":"hello_world_client",
            "id":"0x5555"
        }
    ],

    "services":
    [
        {
            "service":"0x1111",
            "instance":"0x2222",
            "unreliable":"30509"
        }
    ],

    "routing":"hello_world_service",
    "service-discovery":
    {
        "enable":"true",
        "multicast":"224.244.224.245",
        "port":"30490",
        "protocol":"udp",
        "initial_delay_min":"10",
        "initial_delay_max":"100",
        "repetitions_base_delay":"200",
        "repetitions_max":"3",
        "ttl":"3",
        "cyclic_offer_delay":"2000",
        "request_response_delay":"1500"
    }
}
“unicast”:“172.20.10.7” 这里的地址填写我们虚拟机ip地址
“multicast”:“224.244.224.245”, 组播地址保持这个就行
重要的一步,需要将组播地址加入到路由中, 我们看下虚拟机的ifconfig配置,记住这个设备名 ens33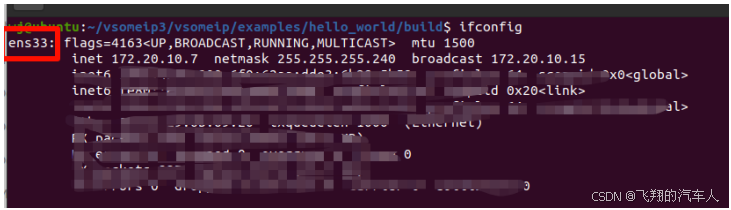
执行以下命令将组播地址加入到路由中
sudo route add -nv 224.244.224.245 dev ens33
命令解释如下
sudo route add -nv <组播地址> dev <你设备名>
最后执行
VSOMEIP_CONFIGURATION=./helloworld-service.json \
VSOMEIP_APPLICATION_NAME=hello_world_service \
./hello_world_service
我们应该可以看到这2条关键和ip地址,组播的关键信息
3.2 helloworld 客户端配置(另一台ubunutu设备,IP: 172.20.10.6)
在客户端PC机上,编写下helloworld-client 客户端的json配置文件,然后将该json文件重命令 “helloworld-client.json”并保存到helloworld / build 目录下即可
{
    "unicast":"172.20.10.6",
    "netmask":"255.255.255.0",
    "logging":
    {
        "level":"trace",
        "console":"true"
    },

    "applications":
    [
        {
            "name":"hello_world_service",
            "id":"0x4444"
        },
        {
            "name":"hello_world_client",
            "id":"0x5555"
        }
    ],

    "services":
    [
        {
            "service":"0x1111",
            "instance":"0x2222",
            "unreliable":"30509"
        }
    ],

    "routing":"hello_world_client",
    "service-discovery":
    {
        "enable":"true",
        "multicast":"224.244.224.245",
        "port":"30490",
        "protocol":"udp",
        "initial_delay_min":"10",
        "initial_delay_max":"100",
        "repetitions_base_delay":"200",
        "repetitions_max":"3",
        "ttl":"3",
        "cyclic_offer_delay":"2000",
        "request_response_delay":"1500"

    }
}
“unicast”:“172.20.10.6” 这里的地址填写我们客户端PC的IP地址
“multicast”:“224.244.224.245”, 组播地址保持这个就行
同样,客户端PC也需要将组播地址加入到路由中, 我们看下客户端PC机的ifconfig配置,记住这个设备名 wlx008736019e12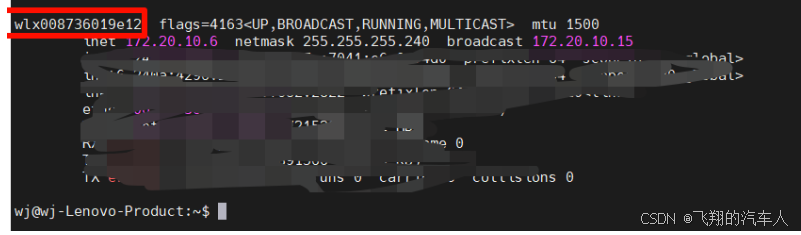
执行以下命令将组播地址加入到路由中
sudo route add -nv 224.244.224.245 dev wlx008736019e12
最后执行运行
VSOMEIP_CONFIGURATION=./helloworld-client.json \
VSOMEIP_APPLICATION_NAME=hello_world_client \
./hello_world_client
看客户端日志已经通讯上了,客户端发送world,服务端回复了 Hello World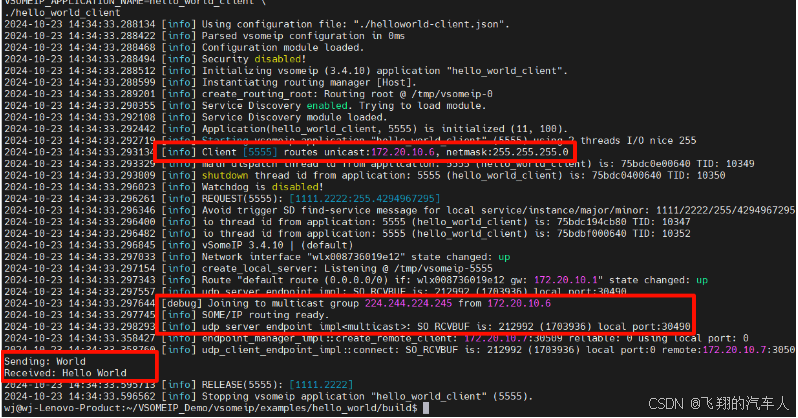
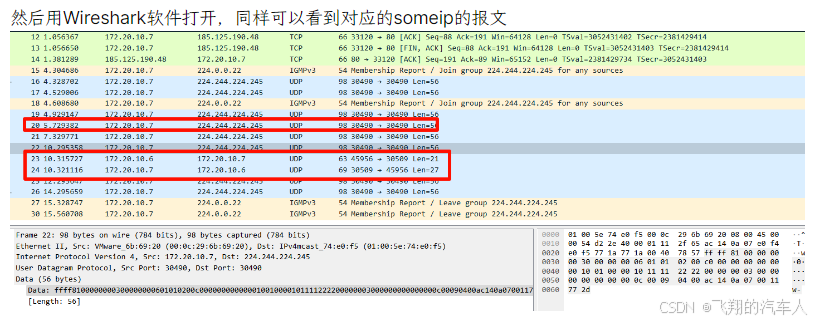
4. Wireshark抓包分析
根据VSOMEIP报文格式,我们用python库简单解析下wireshark抓到的包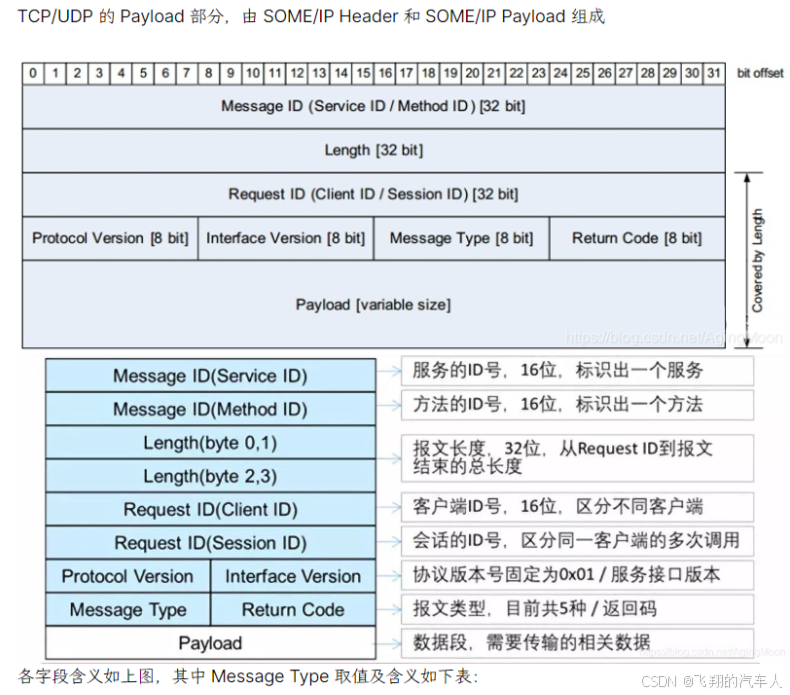
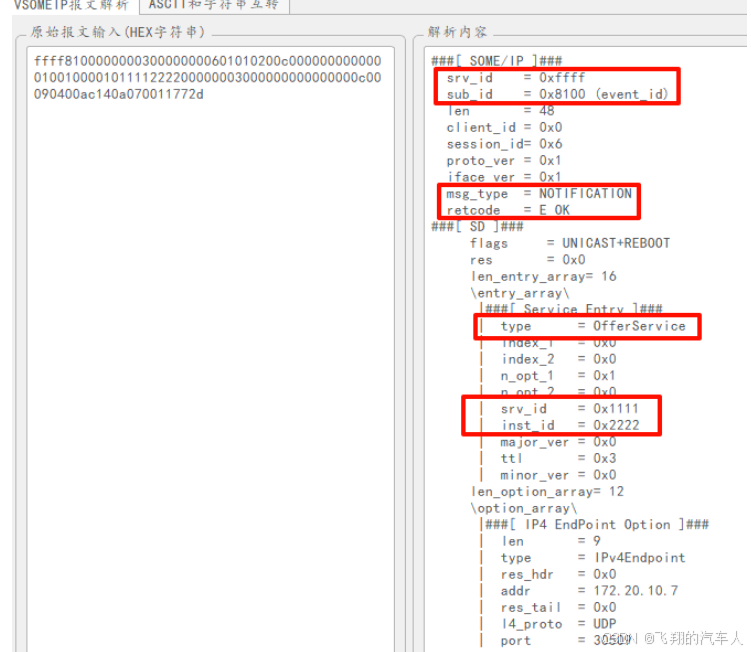
4.1 服务发现报文
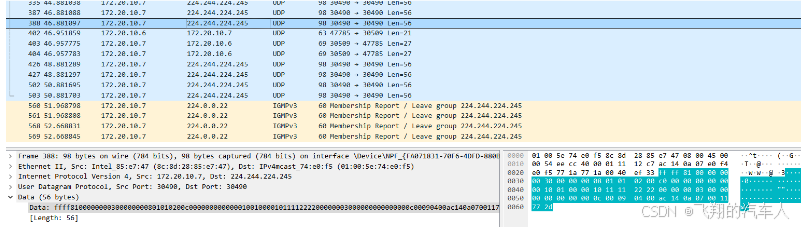
VSOME服务发现报文
ffff8100000000300000000601010200c000000000000010010000101111222200000003000000000000000c00090400ac140a070011772d
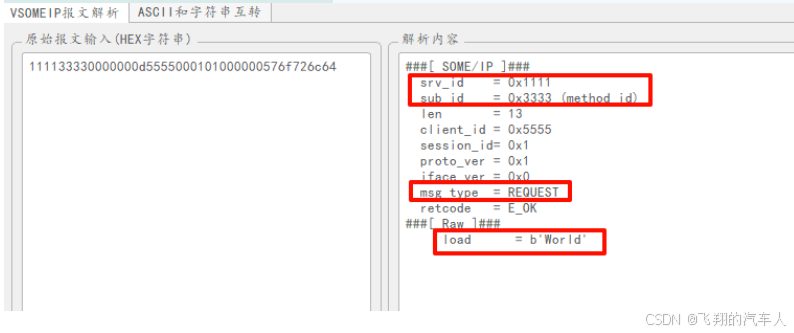
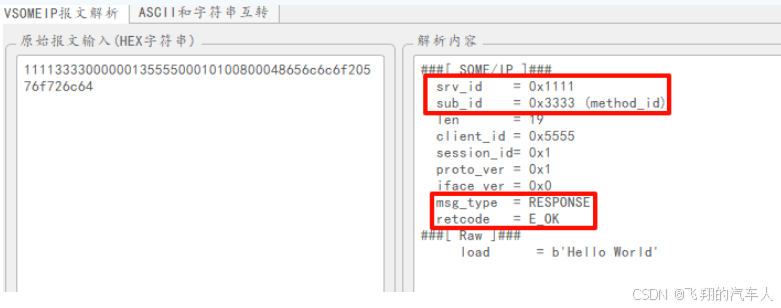
4.2 request&response报文
客户端request报文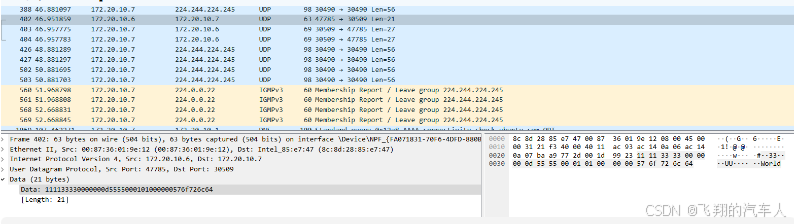
111133330000000d5555000101000000576f726c64
服务端response报文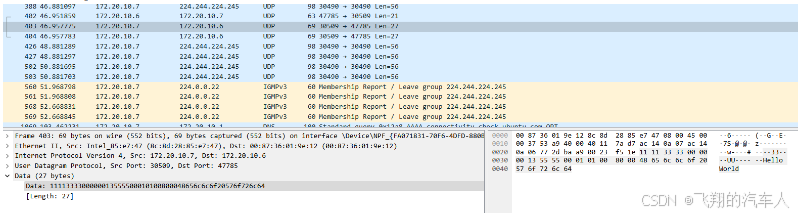
1111333300000013555500010100800048656c6c6f20576f726c64
5. ubuntu中使用tcpdump抓取pcap日志
tcpdump host 172.20.10.7 -w ./tcpdumphelloworld.cap
抓取完成后,生成对应的cap文件
6. 编译测试examples目录下request&response 和 subscribe¬ify
这章内容基本和上面差不多,只是编译测试了examples目录下2个例子和简单分析,附上部分截图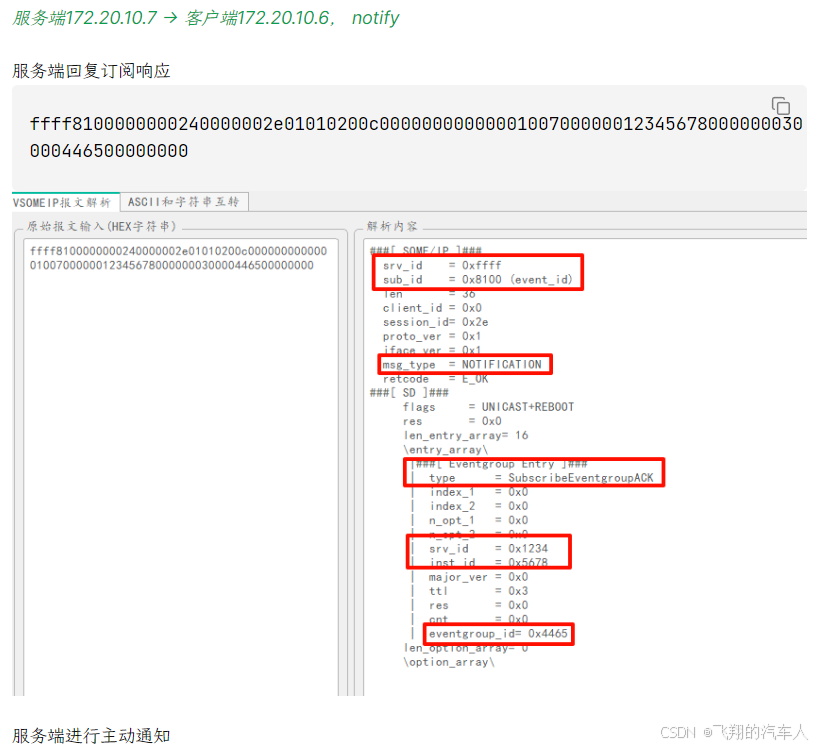
感兴趣的,可以下载下来看下我自己记录的手顺,这里就不再重新写一遍了。
https://download.csdn.net/download/yinzimu/89920802

有“AI”的1024 = 2048,欢迎大家加入2048 AI社区
更多推荐

 13
13 0
0- 0


 已为社区贡献1条内容

所有评论(0)