LangGraph Swarm (Python):构建蜂群式多智能体系统
默认情况下,期望各个智能体通过所有智能体和整个多智能体蜂群图共享的单个消息键进行通信。这意味着来自所有智能体的所有消息将合并到单个共享消息列表中。如果你不希望公开智能体的内部消息历史记录,这可能不是理想的选择。要更改此设置,你可以通过执行以下步骤来自定义智能体:• 使用自定义状态模式,其中消息使用不同的键,例如 alice_messages• 编写一个包装器,用于将父图状态转换为子智能体状态,然后
这是一个使用 LangGraph 构建蜂群式多智能体系统的 Python 库。蜂群是一种多智能体架构,其中智能体根据其专业动态地将控制权移交给彼此。系统会记住哪个智能体上次处于活动状态,确保在后续交互中,对话会从该智能体处继续。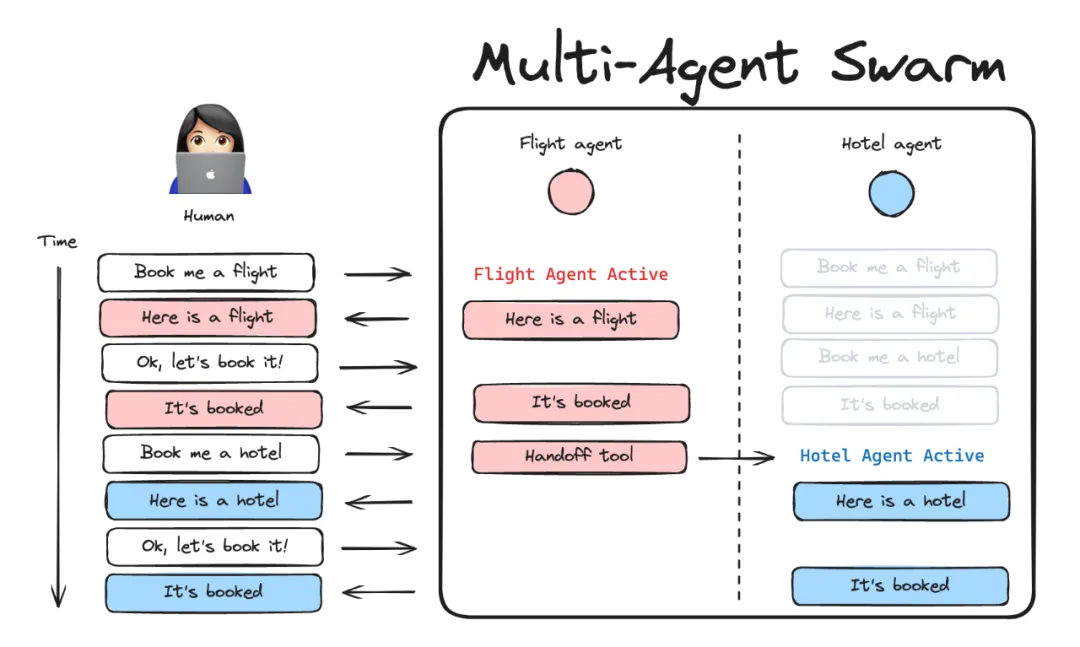
主要特性:
- 多智能体协作: 使专业智能体能够协同工作并将上下文传递给彼此。
- 可定制的移交工具: 内置用于智能体之间通信的工具。
该库构建在LangGraph 之上,LangGraph是一个用于构建智能体应用程序的强大框架,并提供开箱即用的流式传输、短期和长期记忆以及人机协作支持。
安装:
pip install langgraph-swarm
pip install langgraph-swarm langchain-openai
export OPENAI_API_KEY=<your_api_key>
快速入门示例:
from langchain_openai import ChatOpenAI
from langgraph.checkpoint.memory import InMemorySaver
from langgraph.prebuilt import create_react_agent
from langgraph_swarm import create_handoff_tool, create_swarm

model = ChatOpenAI(model="gpt-4o")

def add(a: int, b: int) -> int:
    """Add two numbers"""
    return a + b

alice = create_react_agent(
    model,
    [add, create_handoff_tool(agent_name="Bob")],
    prompt="You are Alice, an addition expert.",
    name="Alice",
)

bob = create_react_agent(
    model,
    [create_handoff_tool(agent_name="Alice", description="Transfer to Alice, she can help with math")],
    prompt="You are Bob, you speak like a pirate.",
    name="Bob",
)

checkpointer = InMemorySaver()

workflow = create_swarm(
    [alice, bob],
    default_active_agent="Alice"
)

app = workflow.compile(checkpointer=checkpointer)

config = {"configurable": {"thread_id": "1"}}

turn_1 = app.invoke(
    {"messages": [{"role": "user", "content": "i'd like to speak to Bob"}]},
    config,
)
print(turn_1)

turn_2 = app.invoke(
    {"messages": [{"role": "user", "content": "what's 5 + 7?"}]},
    config,
)
print(turn_2)
添加短期和长期记忆:
create_swarm() 返回一个 StateGraph 实例,在使用前需要编译。你可以直接将 checkpointer 或 store 实例传递给 .compile() 方法:
from langgraph.checkpoint.memory import InMemorySaver
from langgraph.store.memory import InMemoryStore

# 短期记忆
checkpointer = InMemorySaver()
# 长期记忆
store = InMemoryStore()

model = ...
alice = ...
bob = ...

workflow = create_swarm(
    [alice, bob],
    default_active_agent="Alice"
)

# 使用 checkpointer/store 编译
app = workflow.compile(
    checkpointer=checkpointer,
    store=store
)
重要提示: 添加短期记忆对于在多次交互中保持对话状态至关重要。如果没有它,蜂群会“忘记”哪个智能体上次处于活动状态,并丢失对话历史记录。 如果你计划在多轮对话中使用蜂群,请务必始终使用 checkpointer 编译蜂群;例如,workflow.compile(checkpointer=checkpointer)。
自定义蜂群式多智能体系统:
可以通过更改移交工具的实现或智能体的实现来自定义多智能体蜂群。
自定义移交工具:
默认情况下,假定蜂群中的智能体使用使用预构建的 create_handoff_tool 创建的移交工具。 你也可以创建自己的自定义移交工具。 以下是一些有关如何修改默认实现的建议:
• 更改工具名称和/或描述
• 为 LLM 添加工具调用参数以填充,例如下一个智能体的任务描述
• 更改作为移交的一部分传递给下一个智能体的数据:默认情况下,create_handoff_tool 将完整的消息历史记录(到目前为止在蜂群中生成的所有消息)以及 Command.update 的内容传递给下一个智能体。
重要提示: 如果要更改传递给下一个智能体的消息,则必须在智能体实现中使用不同的状态模式键作为消息(例如,alice_messages)。 默认情况下,所有智能体(子图)状态更新都会在移交期间应用于蜂群(父)图状态。 由于默认情况下假定所有智能体都通过单个消息键进行通信,这意味着智能体的消息会自动合并到父图的消息中,除非智能体对消息使用不同的键。 有关此内容的更多信息,请参见自定义智能体实现部分。
自定义移交工具示例:
from typing import Annotated
from langchain_core.tools import tool, BaseTool, InjectedToolCallId
from langchain_core.messages import ToolMessage
from langgraph.types import Command
from langgraph.prebuilt import InjectedState

def create_custom_handoff_tool(*, agent_name: str, tool_name: str, tool_description: str) -> BaseTool:
    @tool(name=tool_name, description=tool_description)
    def handoff_to_agent(
        # you can add additional tool call arguments for the LLM to populate
        # for example, you can ask the LLM to populate a task description for the next agent
        task_description: Annotated[str, "Detailed description of what the next agent should do, including all of the relevant context."],
        # you can inject the state of the agent that is calling the tool
        state: Annotated[dict, InjectedState],
        tool_call_id: Annotated[str, InjectedToolCallId],
    ):
        tool_message = ToolMessage(
            content=f"Successfully transferred to {agent_name}",
            name=tool_name,
            tool_call_id=tool_call_id,
        )
        # you can use a different messages state key here, if your agent uses a different schema
        # e.g., "alice_messages" instead of "messages"
        last_agent_message = state["messages"][-1]
        return Command(
            goto=agent_name,
            graph=Command.PARENT,
            # NOTE: this is a state update that will be applied to the swarm multi-agent graph (i.e., the PARENT graph)
            update={
                "messages": [last_agent_message, tool_message],
                "active_agent": agent_name,
                # optionally pass the task description to the next agent
                "task_description": task_description,
            },
        )
    return handoff_to_agent
重要提示: 如果你正在实现返回 Command 的自定义移交工具,则需要确保:
(1) 你的智能体具有可以处理返回 Command 的工具的工具调用节点(例如 LangGraph 的预构建 ToolNode)
(2) 蜂群图和下一个智能体图都具有包含你想要在 Command.update 中更新的键的状态模式。
自定义智能体实现:
默认情况下,期望各个智能体通过所有智能体和整个多智能体蜂群图共享的单个消息键进行通信。 这意味着来自所有智能体的所有消息将合并到单个共享消息列表中。 如果你不希望公开智能体的内部消息历史记录,这可能不是理想的选择。 要更改此设置,你可以通过执行以下步骤来自定义智能体:
• 使用自定义状态模式,其中消息使用不同的键,例如 alice_messages
• 编写一个包装器,用于将父图状态转换为子智能体状态,然后再转换回来
from typing_extensions import TypedDict, Annotated
from langchain_core.messages import AnyMessage
from langgraph.graph import StateGraph, add_messages
from langgraph_swarm import SwarmState

class AliceState(TypedDict):
    alice_messages: Annotated[list[AnyMessage], add_messages]

# see this guide to learn how you can implement a custom tool-calling agent
# https://langchain-ai.github.io/langgraph/how-tos/react-agent-from-scratch/
alice = (
    StateGraph(AliceState)
    .add_node("model", ...)
    .add_node("tools", ...)
    .add_edge(...)
    ...
    .compile()
)

# wrapper calling the agent
def call_alice(state: SwarmState):
    # you can put any input transformation from parent state -> agent state
    # for example, you can invoke "alice" with "task_description" populated by the LLM
    response = alice.invoke({"alice_messages": state["messages"]})
    # you can put any output transformation from agent state -> parent state
    return {"messages": response["alice_messages"]}

def call_bob(state: SwarmState):
    ...
然后,你可以通过以下方式手动创建蜂群:
from langgraph_swarm import add_active_agent_router

workflow = (
    StateGraph(SwarmState)
    .add_node("Alice", call_alice, destinations=("Bob",))
    .add_node("Bob", call_bob, destinations=("Alice",))
)

# this is the router that enables us to keep track of the last active agent
workflow = add_active_agent_router(
    builder=workflow,
    route_to=["Alice", "Bob"],
    default_active_agent="Alice",
)

# compile the workflow
app = workflow.compile()
那么,如何系统的去学习大模型LLM?
作为一名从业五年的资深大模型算法工程师,我经常会收到一些评论和私信,我是小白,学习大模型该从哪里入手呢?我自学没有方向怎么办?这个地方我不会啊。如果你也有类似的经历,一定要继续看下去!这些问题啊,也不是三言两语啊就能讲明白的。
所以我综合了大模型的所有知识点,给大家带来一套全网最全最细的大模型零基础教程。在做这套教程之前呢,我就曾放空大脑,以一个大模型小白的角度去重新解析它,采用基础知识和实战项目相结合的教学方式,历时3个月,终于完成了这样的课程,让你真正体会到什么是每一秒都在疯狂输出知识点。
由于篇幅有限,⚡️ 朋友们如果有需要全套 《2025全新制作的大模型全套资料》,扫码获取~
👉大模型学习指南+路线汇总👈
我们这套大模型资料呢,会从基础篇、进阶篇和项目实战篇等三大方面来讲解。

👉①.基础篇👈
基础篇里面包括了Python快速入门、AI开发环境搭建及提示词工程,带你学习大模型核心原理、prompt使用技巧、Transformer架构和预训练、SFT、RLHF等一些基础概念,用最易懂的方式带你入门大模型。
👉②.进阶篇👈
接下来是进阶篇,你将掌握RAG、Agent、Langchain、大模型微调和私有化部署,学习如何构建外挂知识库并和自己的企业相结合,学习如何使用langchain框架提高开发效率和代码质量、学习如何选择合适的基座模型并进行数据集的收集预处理以及具体的模型微调等等。
👉③.实战篇👈
实战篇会手把手带着大家练习企业级的落地项目(已脱敏),比如RAG医疗问答系统、Agent智能电商客服系统、数字人项目实战、教育行业智能助教等等,从而帮助大家更好的应对大模型时代的挑战。
👉④.福利篇👈
最后呢,会给大家一个小福利,课程视频中的所有素材,有搭建AI开发环境资料包,还有学习计划表,几十上百G素材、电子书和课件等等,只要你能想到的素材,我这里几乎都有。我已经全部上传到CSDN,朋友们如果需要可以微信扫描下方CSDN官方认证二维码免费领取【保证100%免费】
相信我,这套大模型系统教程将会是全网最齐全 最易懂的小白专用课!!

有“AI”的1024 = 2048,欢迎大家加入2048 AI社区
更多推荐
 16
16 0
0- 0


 已为社区贡献61条内容

所有评论(0)