SAM本地部署,并从本地加载模型
但是这个代码还有一个问题,就是下面这两行代码需要访问huggingface,但是在批量处理图片的时候,由于网络不稳定,可能会出现失败的情况。(虽然模型会缓存到本地,只用下载一次,但是访问huggingface的流程还是要走的,就可能会出问题)代码前半部分定义了各种功能函数,后半部分是主体代码,其中save_masks函数是我自己写的,增加一个保存mask的功能,其他函数都来自于官方教程。为保证运行
·
关于SAM部署的代码官网等途径都有,我这里也顺便展示一下
只要在原有的深度学习环境中安装了这些库即可完成部署
import torch
from PIL import Image
import numpy as np
import cv2
from transformers import SamModel, SamProcessor
import matplotlib.pyplot as plt


def show_mask(mask, ax, random_color=False):
    if random_color:
        color = np.concatenate([np.random.random(3), np.array([0.6])], axis=0)
    else:
        color = np.array([30/255, 144/255, 255/255, 0.6])
    h, w = mask.shape[-2:]
    mask_image = mask.reshape(h, w, 1) * color.reshape(1, 1, -1)
    ax.imshow(mask_image)

def show_box(box, ax):
    x0, y0 = box[0], box[1]
    w, h = box[2] - box[0], box[3] - box[1]
    ax.add_patch(plt.Rectangle((x0, y0), w, h, edgecolor='green', facecolor=(0,0,0,0), lw=2))

def show_boxes_on_image(raw_image, boxes):
    plt.figure(figsize=(10,10))
    plt.imshow(raw_image)
    for box in boxes:
      show_box(box, plt.gca())
    plt.axis('on')
    plt.show()

def show_points_on_image(raw_image, input_points, input_labels=None):
    plt.figure(figsize=(10,10))
    plt.imshow(raw_image)
    input_points = np.array(input_points)
    if input_labels is None:
      labels = np.ones_like(input_points[:, 0])
    else:
      labels = np.array(input_labels)
    show_points(input_points, labels, plt.gca())
    plt.axis('on')
    plt.show()

def show_points_and_boxes_on_image(raw_image, boxes, input_points, input_labels=None):
    plt.figure(figsize=(10,10))
    plt.imshow(raw_image)
    input_points = np.array(input_points)
    if input_labels is None:
      labels = np.ones_like(input_points[:, 0])
    else:
      labels = np.array(input_labels)
    show_points(input_points, labels, plt.gca())
    for box in boxes:
      show_box(box, plt.gca())
    plt.axis('on')
    plt.show()

def show_points(coords, labels, ax, marker_size=375):
    pos_points = coords[labels==1]
    neg_points = coords[labels==0]
    ax.scatter(pos_points[:, 0], pos_points[:, 1], color='green', marker='*', s=marker_size, edgecolor='white', linewidth=1.25)
    ax.scatter(neg_points[:, 0], neg_points[:, 1], color='red', marker='*', s=marker_size, edgecolor='white', linewidth=1.25)


def show_masks_on_image(raw_image, masks, scores):
    if len(masks.shape) == 4:
      masks = masks.squeeze()
    if scores.shape[0] == 1:
      scores = scores.squeeze()

    nb_predictions = scores.shape[-1]
    fig, axes = plt.subplots(1, nb_predictions, figsize=(15, 15))

    for i, (mask, score) in enumerate(zip(masks, scores)):
      mask = mask.cpu().detach()
      axes[i].imshow(np.array(raw_image))
      show_mask(mask, axes[i])
      axes[i].title.set_text(f"Mask {i+1}, Score: {score.item():.3f}")
      axes[i].axis("off")
    plt.show()

def save_masks(masks, scores):
    if len(masks.shape) == 4:
      masks = masks.squeeze()
    if scores.shape[0] == 1:
      scores = scores.squeeze()
    for i, (mask, score) in enumerate(zip(masks, scores)):
        mask = mask.cpu().detach()
        res = torch.any(mask)
        color = np.array([1, 1, 1])
        h, w = mask.shape[-2:]
        mask_image = mask.reshape(h, w, 1) * color.reshape(1, 1, -1)
        mask_image = mask_image.numpy()*255
        cv2.imwrite(f"mask_{i}.png", mask_image)


device = "cuda" if torch.cuda.is_available() else "cpu"
model = SamModel.from_pretrained("facebook/sam-vit-huge").to(device)
processor = SamProcessor.from_pretrained("facebook/sam-vit-huge")


# Load the image and define the input points
img_path = r"your\local\path\000.png"
raw_image = Image.open(img_path).convert("RGB")
input_points = [[[512, 512]]]  # 2D location of a window in the image

# Process the input image and points
inputs = processor(raw_image, input_points=input_points, return_tensors="pt").to(device)

# Generate the outputs
with torch.no_grad():
    outputs = model(**inputs)

# Post-process the masks
masks = processor.image_processor.post_process_masks(
    outputs.pred_masks.cpu(), inputs["original_sizes"].cpu(), inputs["reshaped_input_sizes"].cpu()
)
scores = outputs.iou_scores

save_masks(masks[0], scores)
show_points_on_image(raw_image, input_points[0])
show_masks_on_image(raw_image, masks[0], scores)
代码前半部分定义了各种功能函数,后半部分是主体代码,其中save_masks函数是我自己写的,增加一个保存mask的功能,其他函数都来自于官方教程。可以根据个人需要调用不同的函数。
但是这个代码还有一个问题,就是下面这两行代码需要访问huggingface,但是在批量处理图片的时候,由于网络不稳定,可能会出现失败的情况。报错如下:
requests.exceptions.ProxyError:
(MaxRetryError("HTTPSConnectionPool(host='huggingface.co', port=443):
Max retries exceeded with url: /facebook/sam-vit-huge/resolve/main/config.json
(Caused by ProxyError('Cannot connect to proxy.',
ConnectionResetError(10054, '远程主机强迫关闭了一个现有的连接。', None, 10054, None)))"), '(Request ID: 57f222ca-8efd-4c0e-aea1-df91b11cc8a4)')
(虽然模型会缓存到本地,只用下载一次,但是访问huggingface的流程还是要走的,就可能会出问题)
model = SamModel.from_pretrained("facebook/sam-vit-huge").to(device)
processor = SamProcessor.from_pretrained("facebook/sam-vit-huge")
为保证运行稳定,改为从本地加载模型,方法如下(非常简单,但是目前好像没有人说清楚,于是我决定自己记录一下)
首先进入这个链接 https://huggingface.co/facebook/sam-vit-huge/tree/main
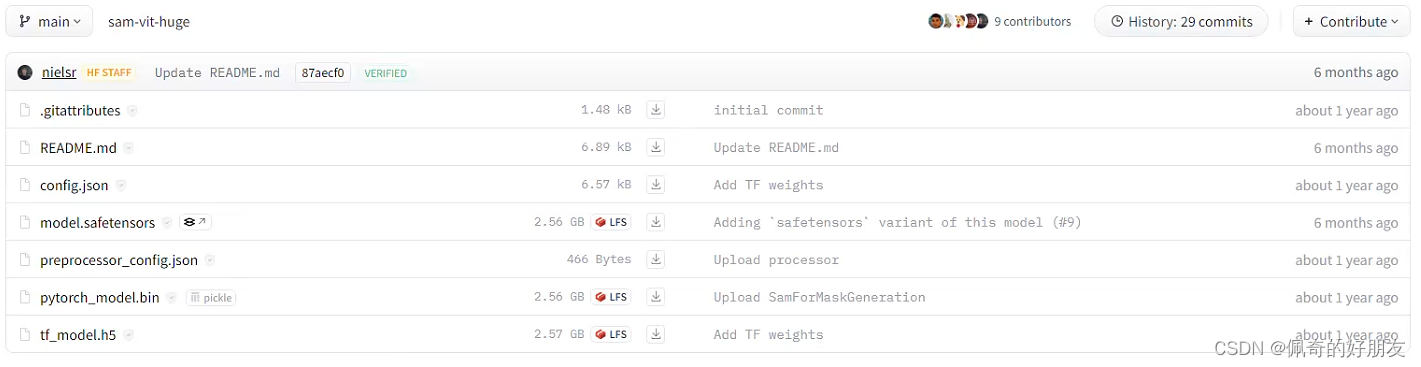 把里面的文件都下载到一个本地文件夹 your/local/path/to/sam-vit-huge
然后把上面两行代码中的路径改为 your/local/path/to/sam-vit-huge 即可
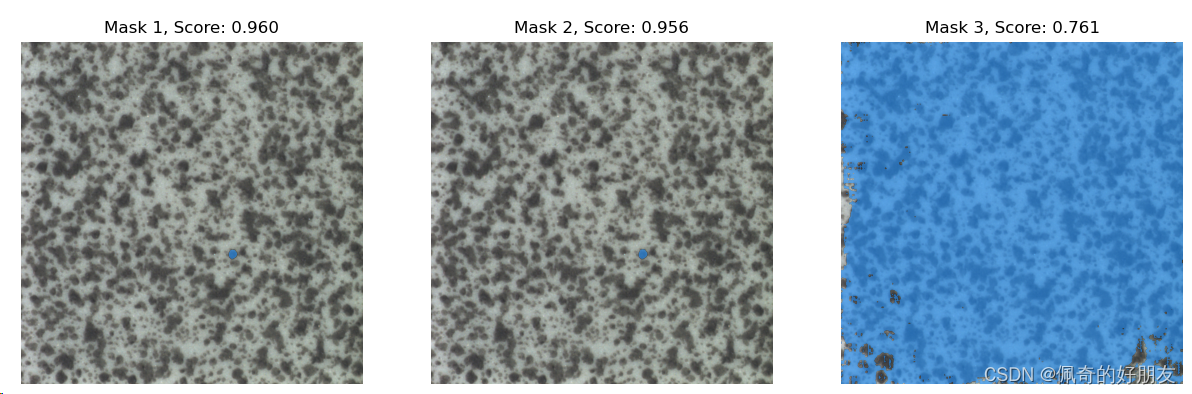
运行成功!效果如下

有“AI”的1024 = 2048,欢迎大家加入2048 AI社区
更多推荐
 5
5 0
0- 0


 已为社区贡献5条内容

所有评论(0)